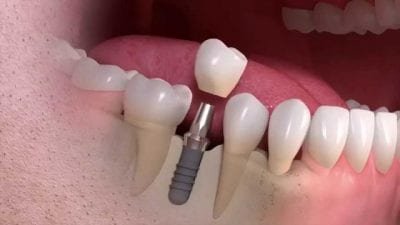
Dental implants are a permanent solution for replacing missing teeth. They mimic the structure of natural teeth by using a titanium post to act as the root and a dental crown that functions as the visible part of the tooth. Here’s a detailed look at the step-by-step process involved in getting a dental implant:
1. Initial Consultation and Evaluation
The journey begins with a comprehensive dental exam.
- Dental X-rays and 3D Imaging: Your dentist takes detailed images of your mouth to assess bone density and determine the precise location for implant placement.
- Medical History Review: Any underlying health conditions or medications are reviewed to ensure you’re a good candidate.
- Treatment Plan: A customized plan is created, detailing the number of implants needed and whether any preparatory procedures (like bone grafting) are necessary.
2. Tooth Extraction (if necessary)
If the damaged or decayed tooth is still present, it will need to be removed.
- Simple Extraction: For teeth that are easy to access.
- Surgical Extraction: For teeth that are broken at the gum line or impacted.
In some cases, the implant can be placed immediately after extraction.
3. Bone Grafting (if needed)
If your jawbone isn’t thick or strong enough to support an implant, a bone graft may be required.
- Types of Bone Grafts: These can be made from your own bone (autograft), donor bone (allograft), or synthetic materials.
- Healing Time: Bone grafting can require several months of healing before the implant is placed.
4. Dental Implant Placement
This is the surgical procedure where the titanium implant is inserted into the jawbone.
- Procedure: The dentist makes a small incision in the gum to expose the bone and drills a hole for the implant.
- Implant Insertion: The titanium post is screwed into the bone, acting as an artificial tooth root.
- Healing Cap: A temporary cap may be placed to protect the site.
5. Osseointegration (3–6 Months)
Osseointegration is the critical phase where the implant fuses with the jawbone.
- What Happens: Over several months, bone cells grow around and anchor the implant.
- Importance: This creates a strong, stable foundation for the replacement tooth.
6. Abutment Placement
Once osseointegration is complete, the abutment is attached to the implant.
- What Is an Abutment?: It’s a small connector that links the implant to the dental crown.
- Procedure: The gum is reopened, the healing cap is removed, and the abutment is placed.
- Gum Healing: The gums typically need a couple of weeks to heal around the abutment before the crown is placed.
7. Dental Crown Placement
The final step is attaching the artificial tooth (crown) to the abutment.
- Crown Fabrication: Impressions of your teeth are taken to custom-make the crown.
- Crown Materials: Options include porcelain, zirconia, or a combination of porcelain fused to metal.
- Final Placement: The crown is securely attached, completing your smile.
8. Aftercare and Maintenance
Proper care ensures the long-term success of the implant.
- Oral Hygiene: Brush and floss daily just like with natural teeth.
- Regular Checkups: Schedule routine dental visits to monitor the implant.
- Avoid Smoking: Smoking can impair healing and reduce the implant’s lifespan.
Conclusion
Dental implants are a highly effective and long-lasting solution for missing teeth. Although the process can take several months, the end result is a natural-looking, fully functional replacement tooth that can last for decades with proper care. If you’re considering dental implants, consult with a qualified implant dentist to determine the best plan for your needs.